Oskar Andreasson - Iptables Tutorial 1.2.2

- Название:Iptables Tutorial 1.2.2
- Автор:
- Жанр:
- Издательство:неизвестно
- Год:неизвестен
- ISBN:нет данных
- Рейтинг:
- Избранное:Добавить в избранное
-
Отзывы:
-
Ваша оценка:
Oskar Andreasson - Iptables Tutorial 1.2.2 краткое содержание
Iptables Tutorial 1.2.2 - читать онлайн бесплатно полную версию (весь текст целиком)
Интервал:
Закладка:
Placement of NAT machines
This should look fairly simple, however, it may be harder than you originally thought in large networks. In general, the NAT machine should be placed on the perimeter of the network, just like any filtering machine out there. This, most of the time, means that the NAT and filtering machines are the same machine, of course. Also worth a thought, if you have very large networks, it may be worth splitting the network into smaller networks and assign a NAT/filtering machine for each of these networks. Since NAT takes quite a lot of processing power, this will definitely help keep round trip time (RTT, the time it takes for a packet to reach a destination and the return packet to get back) down.
In our example network as we described above, with two networks and an Internet connection we should, in other words, look at how large the two networks are. If we can consider them to be small and depending on what requirements the clients have, a couple of hundred clients should be no problem on a decent NAT machine. Otherwise, we could have split up the load over several machines by setting public IP's on smaller NAT machines, each handling their own smaller segment of the network and then let the traffic congregate over a specific routing only machine. This of course takes into consideration that you must have enough public IP's for all of your NAT machines, and that they are routed through your routing machine.
How to place proxies
Proxies are a general problem when it comes to NAT in most cases unfortunately, especially transparent proxies. Normal proxies should not cause too much trouble, but creating a transparent proxy is a dog to get to work, especially on larger networks. The first problem is that proxies take quite a lot of processing power, just the same as NAT does. To put both of these on the same machine is not advisable if you are going to handle large network traffic. The second problem is that if you NAT the source IP as well as the destination IP, the proxy will not be able to know what hosts to contact. E.g., which server is the client trying to contact? Since all that information is lost during the NAT translation since the packets can't contain that information as well if they are NAT'ed, it's a problem. Locally, this has been solved by adding the information in the internal data structures that are created for the packets, and hence proxies such as squid can get the information.
As you can see, the problem is that you don't have much of a choice if you are going to run a transparent proxy. There are, of course, possibilities, but they are not advisable really. One possibility is to create a proxy outside the firewall and create a routing entry that routes all web traffic through that machine, and then locally on the proxy machine NAT the packets to the proper ports for the proxy. This way, the information is preserved all the way to the proxy machine and is still available on it.
The second possibility is to simply create a proxy outside the firewall, and then block all webtraffic except the traffic going to the proxy. This way, you will force all users to actually use the proxy. It's a crude way of doing it, but it will hopefully work.
The final stage of our NAT machine
As a final step, we should bring all of this information together, and see how we would solve the NAT machine then. Let's take a look at a picture of the networks and how it looks. We have decided to put a proxy just outside the NAT/filtering machine as described above, but inside counting from the router. This area could be counted upon as an DMZ in a sense, with the NAT/filter machine being a router between the DMZ and the two company networks. You can see the exact layout we are discussing in the image below.
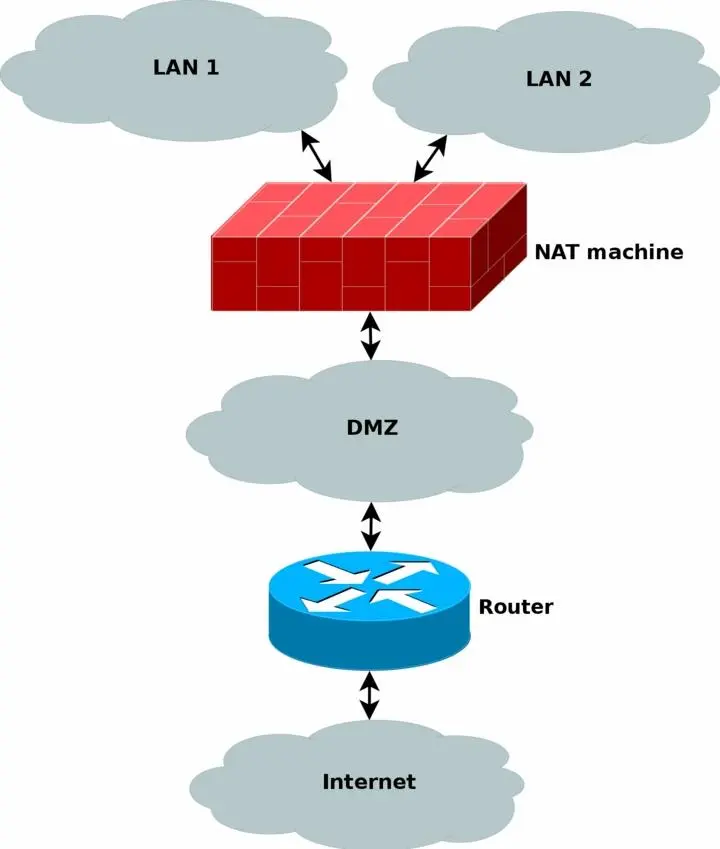
All the normal traffic from the NAT'ed networks will be sent through the DMZ directly to the router, which will send the traffic on out to the internet. Except, yes, you guessed it, webtraffic which is instead marked inside the netfilter part of the NAT machine, and then routed based on the mark and to the proxy machine. Let's take a look at what I am talking about. Say a http packet is seen by the NAT machine. The mangle table can then be used to mark the packet with a netfilter mark (also known as nfmark). Even later when we should route the packets to our router, we will be able to check for the nfmark within the routing tables, and based on this mark, we can choose to route the http packets to the proxy server. The proxy server will then do it's work on the packets. We will touch these subjects to some extent later on in the document, even though much of the routing based part is happening inside the advanced routing topics.
The NAT machine has a public IP available over the internet, as well as the router and any other machines that may be available on the Internet. All of the machines inside the NAT'ed networks will be using private IP's, hence saving both a lot of cash, and the Internet address space.
What's next?
We have in this chapter in detail explained NAT and the theory around it. In special we have discussed a couple of different angles to use, and some of the normal problems that may arise from using NAT together with proxies. This chapter has covered the following areas in detail.
• NAT usage
• NAT components
• NAT history
• Terms and words used about NAT
• Hardware discussions regarding NAT
• Problems with NAT
All of this will always be of use when you are working with netfilter and iptables. NAT is very widely used in today's networks, even though it is only an intermediary solution for a very unfortunate and unexpected problem. NAT will of course be discussed more in depth later on when we start looking at the Linux netfilter and iptables implementations in more depth.
Chapter 5. Preparations
This chapter is aimed at getting you started and to help you understand the role Netfilter and iptables play in Linux today. This chapter should hopefully get you set up and finished to go with your experimentation, and installation of your firewall. Given time and perseverance, you'll then get it to perform exactly as you want it to.
Where to get iptables
The iptables user-space package can be downloaded from the http://www.netfilter.org/ . The iptables package also makes use of kernel space facilities which can be configured into the kernel during make configure. The necessary steps will be discussed a bit further down in this document.
Kernel setup
To run the pure basics of iptables you need to configure the following options into the kernel while doing make config or one of its related commands:
CONFIG_PACKET - This option allows applications and utilities that need to work directly with various network devices. Examples of such utilities are tcpdump or snort.
NoteCONFIG_PACKET is strictly speaking not needed for iptables to work, but since it contains so many uses, I have chosen to include it here. If you do not want it, don't include it.
CONFIG_NETFILTER - This option is required if you're going to use your computer as a firewall or gateway to the Internet. In other words, this is most definitely required for anything in this tutorial to work at all. I assume you will want this, since you are reading this.
And of course you need to add the proper drivers for your interfaces to work properly, i.e. Ethernet adapter, PPP and SLIP interfaces. The above will only add some of the pure basics in iptables. You won't be able to do anything productive to be honest, it just adds the framework to the kernel. If you want to use the more advanced options in Iptables, you need to set up the proper configuration options in your kernel. Here we will show you the options available in a basic 2.4.9 kernel and a brief explanation:
CONFIG_IP_NF_CONNTRACK - This module is needed to make connection tracking. Connection tracking is used by, among other things, NAT and Masquerading. If you need to firewall machines on a LAN you most definitely should mark this option. For example, this module is required by the rc.firewall.txt script to work.
CONFIG_IP_NF_FTP - This module is required if you want to do connection tracking on FTP connections. Since FTP connections are quite hard to do connection tracking on in normal cases, conntrack needs a so called helper; this option compiles the helper. If you do not add this module you won't be able to FTP through a firewall or gateway properly.
CONFIG_IP_NF_IPTABLES - This option is required if you want do any kind of filtering, masquerading or NAT. It adds the whole iptables identification framework to the kernel. Without this you won't be able to do anything at all with iptables.
CONFIG_IP_NF_MATCH_LIMIT - This module isn't exactly required but it's used in the example rc.firewall.txt . This option provides the LIMIT match, that adds the possibility to control how many packets per minute that are to be matched, governed by an appropriate rule. For example, -m limit --limit 3/minute would match a maximum of 3 packets per minute. This module can also be used to avoid certain Denial of Service attacks.
CONFIG_IP_NF_MATCH_MAC - This allows us to match packets based on MAC addresses. Every Ethernet adapter has its own MAC address. We could for instance block packets based on what MAC address is used and block a certain computer pretty well since the MAC address very seldom changes. We don't use this option in the rc.firewall.txt example or anywhere else.
CONFIG_IP_NF_MATCH_MARK - This allows us to use a MARK match. For example, if we use the target MARK we could mark a packet and then depending on if this packet is marked further on in the table, we can match based on this mark. This option is the actual match MARK, and further down we will describe the actual target MARK.
CONFIG_IP_NF_MATCH_MULTIPORT - This module allows us to match packets with a whole range of destination ports or source ports. Normally this wouldn't be possible, but with this match it is.
CONFIG_IP_NF_MATCH_TOS - With this match we can match packets based on their TOS field. TOS stands for Type Of Service . TOS can also be set by certain rules in the mangle table and via the ip/tc commands.
CONFIG_IP_NF_MATCH_TCPMSS - This option adds the possibility for us to match TCP packets based on their MSS field.
CONFIG_IP_NF_MATCH_STATE - This is one of the biggest news in comparison to ipchains. With this module we can do stateful matching on packets. For example, if we have already seen traffic in two directions in a TCP connection, this packet will be counted as ESTABLISHED. This module is used extensively in the rc.firewall.txt example.
CONFIG_IP_NF_MATCH_UNCLEAN - This module will add the possibility for us to match IP, TCP, UDP and ICMP packets that don't conform to type or are invalid. We could for example drop these packets, but we never know if they are legitimate or not. Note that this match is still experimental and might not work perfectly in all cases.
CONFIG_IP_NF_MATCH_OWNER - This option will add the possibility for us to do matching based on the owner of a socket. For example, we can allow only the user root to have Internet access. This module was originally just written as an example on what could be done with the new iptables. Note that this match is still experimental and might not work for everyone.
Читать дальшеИнтервал:
Закладка: