Oskar Andreasson - Iptables Tutorial 1.2.2

- Название:Iptables Tutorial 1.2.2
- Автор:
- Жанр:
- Издательство:неизвестно
- Год:неизвестен
- ISBN:нет данных
- Рейтинг:
- Избранное:Добавить в избранное
-
Отзывы:
-
Ваша оценка:
Oskar Andreasson - Iptables Tutorial 1.2.2 краткое содержание
Iptables Tutorial 1.2.2 - читать онлайн бесплатно полную версию (весь текст целиком)
Интервал:
Закладка:
Required proc configuration - This section should contain all of the required proc configurations for the script in question to work. It could possibly also contain configurations that raise security, and possibly which add special services or possibilities for the administrator or clients.
Non-required proc configuration - This section should contain non-required proc configurations that may prove useful. All of them should be commented out, since they are not actually necessary to get the script to work. This list will contain far from all of the proc configurations or nodes.
Rules set up - By now the scripts should most probably be ready to insert the rule-set. I have chosen to split all the rules down after table and then chain names in the rule-sets, to make them easier to follow and read. All user specified chains are created before we do anything to the system built in chains. I have also chosen to set the chains and their rule specifications in the same order as they are output by the iptables -L command.
Filter table - First of all we go through the filter table and its content. First of all we should set up all the policies in the table.
Set policies - Set up all the default policies for the system chains. Normally I will set DROP policies on the chainsa in the filter table, and specifically ACCEPT services and streams that I want to allow inside. This way we will get rid of all ports that we do not want to let people use.
Create user specified chains - At this point we create all the user specified chains that we want to use later on within this table. We will not be able to use these chains in the system chains anyway if they are not already created so we might as well get to it as soon as possible.
Create content in user specified chains - After creating the user specified chains we may as well enter all the rules within these chains. The only reason I have to enter this data at this point already is that you may as well put it close to the creation of the user specified chains. You may as well put this later on in your script, it is totally up to you.
INPUT chain - When we have come this far, we do not have a lot of things left to do within the filter table so we get onto the INPUT chain. At this point we should add all rules within the INPUT chain.
NoteAt this point we start following the output from the iptables -L command as you may see. There is no reason for you to stay with this structure, however, do try to avoid mixing up data from different tables and chains since it will become much harder to read such rule-sets and to fix possible problems.
FORWARD chain - At this point we go on to add the rules within the FORWARD chain. Nothing special about this decision.
OUTPUT chain - Last of all in the filter table, we add the rules dealing with the OUTPUT chain. There should, hopefully, not be too much to do at this point.
nat table - After the filter table we take care of the nat table. This is done after the filter table because of a number of reasons within these scripts. First of all we do not want to turn the whole forwarding mechanism and NAT function on at too early a stage, which could possibly lead to packets getting through the firewall at just the wrong time point (i.e., when the NAT has been turned on, but none of the filter rules has been run). Also, I look upon the nat table as a sort of layer that lies just outside the filter table and kind of surrounds it. The filter table would hence be the core, while the nat table acts as a layer lying around the filter table, and finally the mangle table lies around the nat table as a second layer. This may be wrong in some perspectives, but not too far from reality.
Set policies - First of all we set up all the default policies within the nat table. Normally, I will be satisfied with the default policy set from the beginning, namely the ACCEPT policy. This table should not be used for filtering anyways, and we should not let packets be dropped here since there are some really nasty things that may happen in such cases due to our own presumptions. I let these chains be set to ACCEPT since there is no reason not to do so.
Create user specified chains - At this point we create any user specified chains that we want within the nat table. Normally I do not have any of these, but I have added this section anyways, just in case. Note that the user specified chains must be created before they can actually be used within the system chains.
Create content in user specified chains - By now it should be time to add all the rules to the user specified chains in the nat table. The same thing goes here as for the user specified chains in the filter table. We add this material here since I do not see any reason not to.
PREROUTING chain - The PREROUTING chain is used to do DNAT on packets in case we have a need for it. In most scripts this feature is not used, or at the very least commented out. The reason being that we do not want to open up big holes to our local network without knowing about it. Within some scripts we have this turned on by default since the sole purpose of those scripts is to provide such services.
POSTROUTING chain - The POSTROUTING chain should be fairly well used by the scripts I have written since most of them depend upon the fact that you have one or more local networks that we want to firewall against the Internet. Mainly we will try to use the SNAT target, but in certain cases we are forced to use the MASQUERADE target instead.
OUTPUT chain - The OUTPUT chain is barely used at all in any of the scripts. As it looks now, it is not broken, but I have been unable to find any good reasons to use this chain so far. If anyone has a reason to use this chain, send me a line and I will add it to the tutorial.
mangle table - The last table to do anything about is the mangle table. Normally I will not use this table at all, since it should normally not be used for anyone, unless they have specific needs, such as masking all boxes to use the exact same TTL or to change TOS fields etc. I have in other words chosen to leave these parts of the scripts more or less blank, with a few exceptions where I have added a few examples of what it may be used for.
Set policies - Set the default policies within the chain. The same thing goes here as for the nat table, pretty much. The table was not made for filtering, and hence you should avoid it alltogether. I have not set any policies in any of the scripts in the mangle table one way or the other, and you are encouraged not to do so either.
Create user specified chains - Create all the user specified chains. Since I have barely used the mangle table at all in the scripts, I have neither created any chains here since it is fairly unusable without any data to use within it. However, this section was added just in case someone, or I, would have the need for it in the future.
Create content in user specified chains - If you have any user specified chains within this table, you may at this point add the rules that you want within them here.
PREROUTING - At this point there is barely any information in any of the scripts in this tutorial that contains any rules here. Basically, the PREROUTING chain can be used to set netfilter, routing and SEC marks, both on a per packet basis and on a per connection basis.
INPUT chain - The INPUT chain is barely used in the current scripts of the tutorial, but it could be used for mark handling for example.
FORWARD chain - The FORWARD chain of the mangle table can be used for mark handling and for mangling packet headers of packets that are traveling across the firewall in question. Changing TTL and TOS for example.
OUTPUT chain - The OUTPUT chain could be used to mangle the packets leaving the firewall or host itself, for example setting different marks or setting TTL or TOS values. This is not done in most of the scripts here, but the section has been added however.
POSTROUTING chain - This chain is basically not in use by any of the scripts in the tutorial as of writing this, but it could be used to setting values for all packets leaving both the host or firewall itself, and traffic traversing the machine. For example, it could be used to reset the MTU of packets, set TTL or TOS et cetera.
Hopefully this should explain more in detail how each script is structured and why they are structured in such a way.
Caution!Do note that these descriptions are extremely brief, and should mainly just be seen as a brief explanation to what and why the scripts have been split down as they have. There is nothing that says that this is the only and best way to go.
rc.firewall.txt
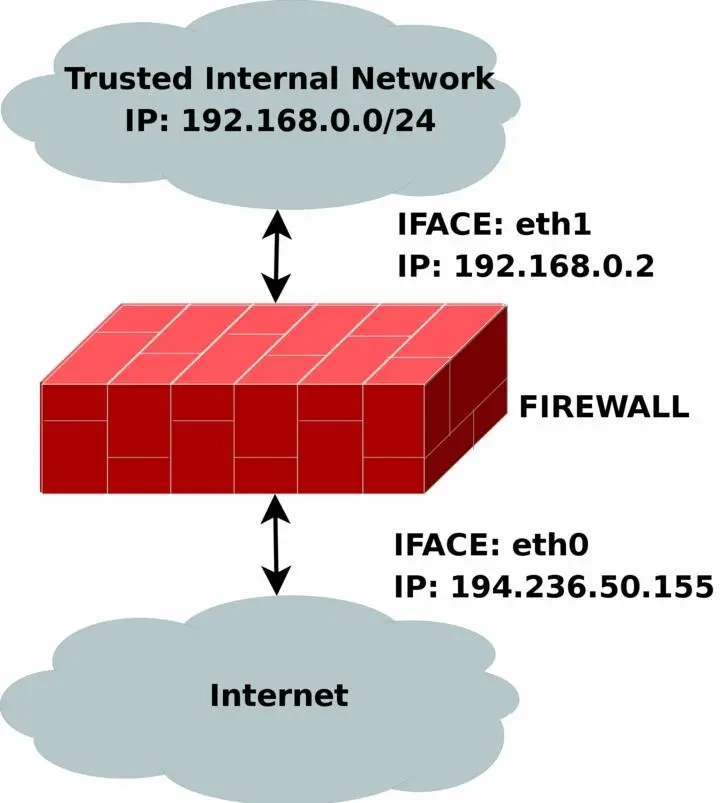
The rc.firewall.txtscript is the main core on which the rest of the scripts are based upon. The rc.firewall file chapter should explain every detail in the script most thoroughly. Mainly it was written for a dual homed network. For example, where you have one LAN and one Internet Connection. This script also makes the assumption that you have a static IP to the Internet, and hence don't use DHCP, PPP, SLIP or some other protocol that assigns you an IP automatically. If you are looking for a script that will work with those setups, please take a closer look at the rc.DHCP.firewall.txt script.
The rc.firewall.txt script requires the following options to be compiled statically to the kernel, or as modules. Without one or more of these, the script will become more or less flawed since parts of the script's required functionalities will be unusable. As you change the script you use, you could possibly need more options to be compiled into your kernel depending on what you want to use.
• CONFIG_NETFILTER
• CONFIG_IP_NF_CONNTRACK
• CONFIG_IP_NF_IPTABLES
• CONFIG_IP_NF_MATCH_LIMIT
• CONFIG_IP_NF_MATCH_STATE
• CONFIG_IP_NF_FILTER
• CONFIG_IP_NF_NAT
• CONFIG_IP_NF_TARGET_LOG
rc.DMZ.firewall.txt
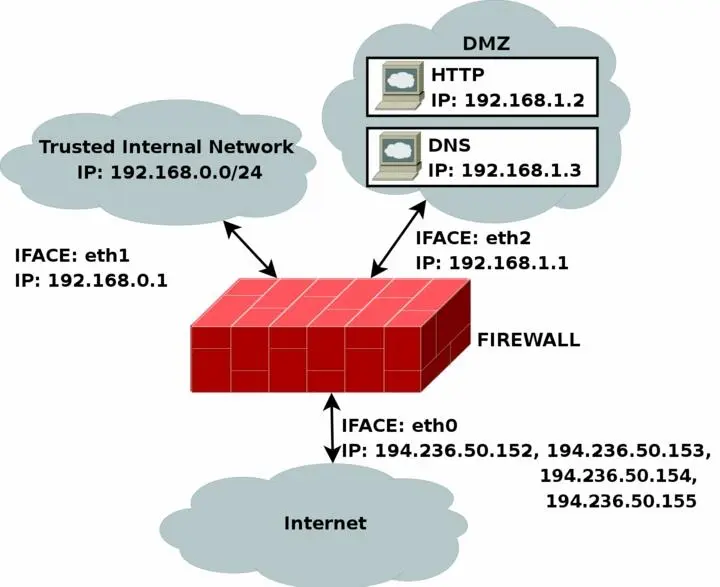
The rc.DMZ.firewall.txtscript was written for those people out there that have one Trusted Internal Network, one De-Militarized Zone and one Internet Connection. The De-Militarized Zone is in this case 1-to-1 NATed and requires you to do some IP aliasing on your firewall, i.e., you must make the box recognize packets for more than one IP. There are several ways to get this to work, one is to set 1-to-1 NAT, another one if you have a whole subnet is to create a subnetwork, giving the firewall one IP both internally and externally. You could then set the IP's to the DMZed boxes as you wish. Do note that this will "steal" two IP's for you, one for the broadcast address and one for the network address. This is pretty much up to you to decide and to implement. This tutorial will give you the tools to actually accomplish the firewalling and NATing part, but it will not tell you exactly what you need to do since it is out of the scope of the tutorial.
The rc.DMZ.firewall.txt script requires these options to be compiled into your kernel, either statically or as modules. Without these options, at the very least, available in your kernel, you will not be able to use this scripts functionality. You may in other words get a lot of errors complaining about modules and targets/jumps or matches missing. If you are planning to do traffic control or any other things like that, you should see to it that you have all the required options compiled into your kernel there as well.
Читать дальшеИнтервал:
Закладка: